Microbial Magic

Anatomy, Inspiration, Prints, Traditional Work

The season of giving will soon be upon us so I thought I this would be a great opportunity to search the web and curate a mini exhibition of the anatomically awesome things that people create! For the first of this series lets start small, with some microbes!

Society6 is one of the sites I joined last year to help promote my work. And through it I have been able to find a variety of fresh yet talented artists:

Microbe 1 by Veronica Martinis


Microbe Family by AMOSLIDE

(And I am not quite sure what this is, but I like it too  … )

Microbes are also quite fashionable:

Bacteria – Thousands Of ‘Em (Pink) by Chayground

Microbe Onsie

Histoplasma Capsulatum by Yours Truely 😉 ( Autumn Kulaga )

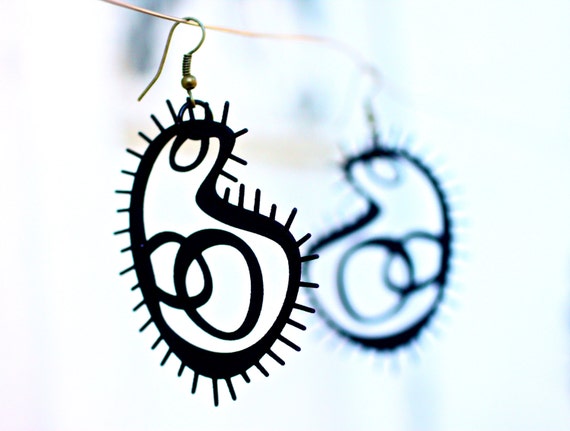
Retro Amoeba Earrings by LemantulaDesigns


Or maybe you know someone that appreciates more tangible objects. You know grown adults searching for “collectables” ( a.k.a desk toys) .

Bacteriophage T7 Model

Shapeways is an amazing site bringing 3D printing and prototyping capability to the masses.

4c9o by Virtox

E-coli Toxin by Anthromod


And of course we can’t forget about the more commonly known plush microbes. Cuddly enough for an infant, even the bed bug is adorable!

Bed Bug Plush


Alicia Watkins is an Etsy Vendor who will create any one of a variety of microbes by cross stitch:

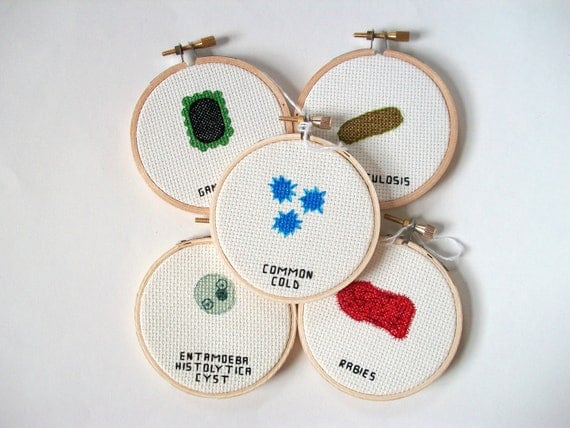
Microbes cross stitch set by Alicia Watkins

Or perhaps you are crafty enough to try out some of her patterns yourself?!


Know of any other microbial wonders? Feel free to share in the comments of this post!

Cervical Spinal Fusion of C1 & C2 Vertebrae

Anatomy, Surgical, Traditional Work

The surgery I observed was to correct a type II fracture of the dens on the axis, a bone articulating with the atlas.  The atlas and the axis are the first vertebrae of the spine. The atlas (C1) articulates with the base of the skull. This atlantooccipital joint helps create a head nod (‘yes’ motion). The atlantoaxial articulation rotates along a vertical axis, creating a head shake (‘no’ motion).

The patient had broken their dens, a process on the axis articulating with the atlas. Even though the neck had been braced for some time, the area would not heal. To correct this screws and rods were placed in the pedicle of the vertebra. Being that they are irregular vertebrae, it might be more correct to say the screws were under the articulating facets. This is lateral to the vertebral foramen and away from the vertebral arteries.


For my portfolio I plan to finish filling in the tone of the remaining drawings but for the assignment the first three illustrations were fully rendered in tone. I really like using the toned background.  I think it was a good choice, especially since I had so much bone to render! The toned paper gave me more flexibility when rendering the light tones.


I can’t wait to fill in the bone chips and render the suture line!

Sketching in the OR

Anatomy, Surgical, Traditional Work

While some people might find being in a surgical operating room uneasy and slightly awkward, I find it amazingly intriguing. First of all you get to wear and sweet get up:

Stylish… I know, but it’s all in the name of hygiene  For our first surgical illustration assignment the goal was to view as many surgeries as possible and see different techniques. This exercise was to help build our surgical illustration visual library, a mental reference of as many tissue manipulations as possible.

Deep incision on the upper arm

Blunt dissection of superficial tissue

When you first go in the OR, anything can be happening. Sometimes no one is in the room, at others the surgery has already started. Everyone has a face mask on, so you can only see eyes. I found it took a little bit of re-learning body language without certain facial features to pick up on. But you quickly pick up on interpretations as well as etiquette.

Tissue manipulation and suture hemostasis; removal of fistula

Cauterization of skin tissue using hemostat

Some surgeries I couldn’t see anything, I would be on my tippy-toes, or crouching down just to get a glimpse of what was going on. If you have a more inviting OR team, they will help direct you to a place where you can see something, but still be out of the way. At other times the surgical field is so small, that regardless of how people move, you do not see anything. In instances like this I find it helpful to stay close ( but out of the sterile field) and listen to any discussion about the procedure.

Suturing skin to areola and staple retraction

Suturing scalp

Cauterizing skin tissue (hemostasis)

I am very thankful for this opportunity. It is amazing to be able to observe some of the complicated procedures surgeons are performing in real time. The chance to see teams of people work together for the health of one individual.

Anatomy on Society6

Anatomy, Traditional Work

Last year I joined Society6. This online art community has a nice collection of self-published work. This site provides work by a lot of different artists, all of which have added themselves to the community. It is amazing to see how creativity flows throughout our society.

Society6 provides a means for artists to share as well as sell their artwork as prints, phone cases or hoddies/tshirts. While the artist does not always making a lot per piece -depending on what profit they set for themselves with each print- they are able to help create awareness of what they do. And while some people are of the opinion sites like this “cheapen” the value of art, I think it is a great way for artists to build a community, share work, and fund their addictive art habits. It almost feels like going to the farmers market, and buying locally.

For this post I just wanted to share a collection of Anatomy Art I found while searching the site:

Gross Anatomy by Asleepstanding

The Eye by Broken Colors

True Anatomy by Ben Geiger

Anatomy 03 by Alvaro Tapia Hidalgo

Being Human 3 by Anapt

Boy Next Door – Silhouette and Anatomy Love Painting
by Joy Chokchai

Society6 has a lot of work to share, don’t be afraid to explore more!

The Eye’s Have It

Graphical Works, Surgical, Traditional Work

Recently returning from AMI Annual meeting, I immediately began the intense work load which the final Summer 2012 week has brought forth (or I saved for myself, tomato/tomato). I hope to show my piece from the workshop and discuss the AMI experience, but for now I want to display some work from this semester.

A recurring theme seemed to be The Eye

The first illustration displays a transverse cut through the eye. You are looking inferior half of the globe of the eye, with detail of structures within the eye. Adobe Illustrator was really helpful for this project. It helped keep lines clean and clear, facilitating depiction of the different layers making up the eye structure.


Cataract Surgery – Replacement of the Posterior Intraocular Lens

The steps I set out to depict are (a) cutting of the cornea, (b) capsulorhexis – circular cut to the lens envelop to gain access to the lens nucleus (pulp of the lens), (c) Phasoemulsification, (d) placement of the posterior chamber intraocular lens (IOL)  into the lens envelope.

I really enjoyed rendering the phacoemulsification step of the procedure. I was excited about the texture of the lens pulp! I feel more comfortable rendering in Photoshop, now I just need to get that feeling when digitally painting too ( i.e. using color ).

Followed by some surgical instruments


Comments and critiques always welcome.

Or perhaps you have some surgical stories to share?!

First Publication

Traditional Work

About three years ago my roommate, Jennifer Rogers, and I  took independent studies with our anatomy teacher, Dr. Rodriguez at Virginia Commonwealth University, to help produce illustrations for their lab manual. Today we received our copies of the lab manual. It is a pretty cool feeling.

I produced illustrations of the lower extremities skeletal system. Jenn created the illustrations of the muscles in the lower extremities. Both of us used pen and ink techniques.

No no, not like Netter … like Max Brodel.

Just Learning, Traditional Work

When someone asks, “What is medical illustration?”, the answer is not very straight forward ( and sometimes those of us within the field can even be surprised as to how “all encompassing” the term can be). The first thing that usually pops into others minds is Frank H. Netter. Don’t get me wrong, he was good at what he did. However there are many more, very talented artists which practiced before him and helped establish the field.

One of histories profound medical illustrators is Max Brodel. Brodel was from Germany and came to America in his late 20’s to work for Howard Kelly. In 1911 he helped establish, and began to teach at, the first school of medical illustration, Art as Applied to Medicine at Johns Hopkins School of Medicine.

Brodel is also well known for an illustration technique he developed, carbon dusting.  Carbon dusting, as I have come to understand it, is a gradual process of adding carbon dust and applying it with a carbon pencil to a specific type of board. My class’s assignment was to recreate a carbon dust illustration by Brodel, not with carbon dust, but using Adobe Photoshop. The image I chose is shown above, a transverse section of the brain I started by doing the drawing, scanning it and in photoshop applying a mid-tone grey to the whole drawing. Next, I worked through gradually shading parts, starting large and working into small details. To do this I used a combination of shape adjusting brush with zero hardness and varying shades of gray. Sometimes I made the brush mode ‘multiply’. At other times, when needing to darken whole areas, I used the burn tool. Then I went back to lighten, add highlights, to necessary parts of the illustration. For this I used a white brush, never the dodge tool.

This was one of those pieces you could work on FOREVER, so I mainly focused on the bottom portion of the brain. The process was very enjoyable. It was easy to get lost in the details, but nice when I zoomed out and could see the piece coming together as a whole.

My brown eyed girl . . .

Traditional Work

Tomorrow is the SAMA Bake Sale!  SAMA stands for the Student Association of Medical Artists. I volunteered to make eyeball cookies. It was quite an adventure.

Earnings from the bake sale fund our organization’s activities such as figure drawing (which is also open to the rest of the student body) and to help cover fees student may have to pay in order to enter artwork at the annual AMI conference. Stop by and indulge in some sweets!

Later this month we are also hosting a shindig at the Drum & Monkey on Taylor Street!

The Uterus

Inspiration, Planning Ahead, Traditional Work

Invertebrates produce motile spermatozoa and non-motile spermatozoa, giving their sub-phyla the flexibility to produce sexually or asexually. Vertebrates produce sexually. Non-mammalian vertebrates posses an oviduct. Being mammalian vertebrates, the females in our species possess a uterus (plural uteri or “uteruses”), also known as ‘the womb’. It is a strong and flexible organ, with thick muscular tissues. It is a place specifically developed to hold and nourish the fertilized ovum.

The uterus is pear shaped and located inside the pelvis. It is dorsal and slightly rostral to the bladder. The pelvic diaphragm sits below the uterus, supporting it. Other support is gained from ligaments suspending the organ.

I am choosing to illustrate the uterus because of its unique round shape, the fact it is accompanied by  small tubes (fallopian tubes). Also becasue it is suspended by mesenteries, which should provide some neat textures to explore in pen and ink.

Sketches to come soon!

Heart & Liver Drawing – Fin

Traditional Work

Assignment 3 is complete! Well enough for critique. One thing with artwork is the infinite feeling of ‘more that could be done’.  First I would like to show you my shapes:

And now for the final piece (sans labeling):

Some advice I was given was to incorporate darker darks and some lighter lights, including but not limited to contrast. I did start to loose some over all shape of the heart as a whole when I got into working on the textures. This assignment was interesting because a lot of people executed the liver differently, and seeing the solutions to different problems was enlightening. A big problem with this task, was to figure out how to show that all the different veins going into the right atrium separately. Given that they are all in the same area, it was easy to misconstrue the drawing and lead the audience to believe all the veins joined together before entering the atrium. A successful solution, used by most, was ghosting the veins behind the left hepatic vein. Another individual displayed this even more successfully with a ‘cut-out’ of the left hepatic vein, showing where the veins drain into the atrium.

Over all though I feel confident that I put all I could into this piece by planning ahead, looking at lots of research and discussing issues during the creation process. I look forward to going back into this drawing and really punching up the over all form of the heart!